Web page trigger automation has been widely used by big businesses for a (relatively) long time. Think about the Amazon emails that serve up suggested product promotion emails based on what products you’ve been looking at or the retargeting ‘magic’ that’s been happening on Facebook over the last few years (where you see ads from businesses whose website you recently visited).
This is a feature I’ve been waiting on for a long time and I’m thrilled Infusionsoft has recently added it to its automation arsenal.
If you don’t use Infusionsoft or know what it is, head over to our full Infusionsoft review page to learn more.
Why Page Trigger Automation
Before diving into how it works and what you’ll need to get started (which isn’t much), let’s talk about why you’d use something like this.
I refer back to Jermaine Griggs’s definition of marketing automation quite a bit because I think it’s the perfect explanation of what’s possible with tools like Infusionsoft.
He calls it ‘scaling personal attention’.
Think about it, there aren’t many tools that allow you to give the type of personal care and communications your prospects and customers need without the use of automation.
Examples for Your Business
Here are a few examples of leveraging page-trigger automation for your business, including a few that I’ll be testing out:
- Send a sales rep a notification that a lead has recently viewed your pricing page or order form, but didn’t sign up or buy
- Apply a tag or note to a contact who read a certain blog post
- Send an email directly to a prospect after they visited a free consultation page, but didn’t sign up
- Ask a prospect if they’d like to be the next testimonial on your website after they’ve perused your testimonial page (only half joking)
- Count how often people visit certain pages on your site
- Check out this great example from the Monkeypod Blog.
(Do this all tactfully. You don’t want to creep anyone out by telling them you know what they’re doing.)
How it works
Infusionsoft uses cookies to match your CRM contact records with website visitor records. This means there needs to be a nice hand-off between Infusionsoft and your website. This happens when a contact does one of the following:
- Clicks a link in an email
- Submits a hosted or JavaScript embedded web form
- Submits a landing page form
- Submits an order form
- Submits an order via the shopping cart
In each of these cases, Infusionsoft is able to match contacts with visitors. Because it’s cookie based, it won’t always be 100% accurate when people switch devices, like going from desktop to mobile phone. It’s also important to note here that you should use the default Infusionsoft webforms when possible rather than 3rd party integrations, which likely won’t be able to support this feature.
How to Implement
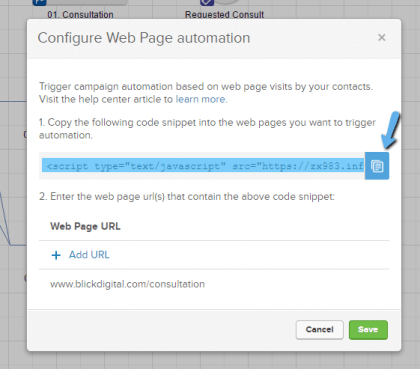
Step 1: Install the script on your website. You’ll see instructions when you drag out the new page trigger goal in Infusionsoft. They call it “Web Page Automation”. If your website has an area for 3rd party scripts, like Google Analytics or the Facebook Pixel, just paste the code below whatever else you have in there.
Step 2: Identify where the important pages on your website live in the marketing funnel. For example, someone looking at blog post about a general topic in your industry is less likely to buy than someone who’s looking at a pricing or testimonials page.
In this example, I would say your blog post is top of funnel content and the pricing and testimonial pages are middle or bottom of funnel content pages. Use a simple tool like Google Draw to build something like this:
From here, I would start with the low-hanging fruit. In other words, let’s automate activities for prospects who are looking at bottom of funnel content first and then move to the middle.
Step 3: Identify what you’d like to automate and check out the examples list above for ideas.
During this step, you need to identify automation that is congruent with the content your prospects are looking at. For example, if someone is looking at the pricing page and they don’t buy then let the sales rep know that or offer an incentive for them.
Step 4: Build the Infusionsoft Campaigns
As best practice, I suggest creating a campaign that’s dedicated only to page trigger automations so you can find them all easily in the future.
This is a new feature and I’m sure there will be those smarter than me coming out with really cool ideas, but here are a few things to always remember when setting this up:
- In my testing, the triggers happen almost immediately when someone visits a page. Use delay timers after your page trigger to allow your prospect to consume the content before sending an automated email.
- Understand the end goal and STOP the automation from happening if the prospect reaches that point. For example, if the page trigger is on your free consult page and then you send them an automated email after they request a consult, you’ll look really sloppy. Use the free consult tag to stop the email from getting sent.
- Use decision diamonds to filter people who shouldn’t receive the automation. For example, if someone has already received an email about giving a testimonial after going to your testimonials page, don’t send it to them again. Also, if they’re already a customer, it generally doesn’t make sense to send them info for prospects, so filter them out too.
- As always, label your campaigns and tags correctly, so you can stay organized. (Click here for more about tag naming best practices).
Use this guide to help you set up your new automation feature and increase your sales and conversions.
Every business is different and I’m curious how you’ll be using the new feature. Please leave a comment below.
Here’s a quick tutorial of how I’m using it in my business:

